Showing posts with label machine embroidery. Show all posts

Wednesday, October 28, 2015

"Breaking Boundaries" exhibition by the Textilers

The textile art group that I belong to, Textilers, has just held an exhibition in which we made the effort to break our artistic boundaries.  I would say that everyone succeeded very well.  It was a terrific show.  These are my own entries.
Meditation Bowl - totally recycled yarns from Op Shops over strips of recycled fabrics.  Boundary Broken - using traditional coiling with non-traditional basketry materials.
Phoenix Regenerating - rayons threads in machine-embroidered feathers and head, real feathers.  Boundary Broken - extending my machine embroidery skills.
detail of above
Rundle Mall.  Machine-stitched figures from my sketches.  Boundary Broken - drawing people, fifty years after being told I couldn't draw.
detail of above

Wednesday, August 12, 2015

Machine stitching feathers

I have been working on one of my favourite things – feathers.  I love the softness, the colours, of feathers.  A wall hanging I have just made combines stitched feathers with real ones.  
In the first picture, you can see a stitched semi-plume feather which is one that has the central shaft (the rachis) and vanes with barbs, but no barbules, which are the tiny hooks on the ends that zip the edges of the feather together and keep the shape.  So it looks much like a little fluffy Christmas tree.  You will notice how I have stitched this with a few machine stitches to a shred of wool roving and the feather itself is in variegated metallic thread.

The next picture shows a couple of feathers stitched in bright yellow rayon thread.  I have combined these with yellow wool roving and a real feather – that’s the white one.


I have left lots of loose threads because I like the texture, and it helps to give a slightly raised look, along with the feathers themselves being malleable, as they are stitched on water-soluble film.  Always do at least two lines over each other before dissolving.  The result if you don’t is distinctly weird!

Friday, July 24, 2015

Cable stitch

Continuing with my machine embroidery experiments, I tried cable stitch – that it, working upside down so that the bobbin thread is the right side.  I used a red silk hand embroidery thread in the bobbin – wound on by hand – and white top thread.  The top tension is loosened, the bobbin tension tightened.  Do this a little at a time –it is better to buy a separate bobbin holder to use for machine embroidery tension loosening, as it can be hard to return the screw to the correct position for normal sewing.  The top thread will appear to be couching the bobbin thread and as the feed dogs are down, you can make the appearance of the couching very close to spread far apart.  In the small end of my paisley, you can see how working straight stitch rows on top of each other gives a heavy texture.  I can imagine this becoming valuable when working rock strata in a landscape, or various other more conceptual types of work.  Notice also how, on the curves, there evolves some straight stitches at right angles to the line of the bobbin thread – still the top thread coming through but it stretches out as you move the stitch line on a diagonal.  

Monday, July 20, 2015

Adelaide Rosella

The Adelaide Rosella is a local hybrid of the Yellow and Crimson Rosella.  Recently I started to spend more time on developing my skills in machine embroidery.  This is because arthritis prevents me from hand embroidery now.  So I decided to extend myself into this area, which I had previously touched on but nothing further.  I bought a book by Carol Shinn called Freestyle Machine Embroidery, and started working through the exercises.  Following the exercise on blending of colours, (feed dogs down) I completed my Adelaide Rosella by blending on the belly area, during which I found it was better to use the lighter colour to make the last layer or it didn’t show up enough.  It is important to have enough shades in the colour chosen that are close enough to grade smoothly, and I found that harder than I expected – my orange-yellows blended better than did my orange-reds, you can see that in the photo.  Once more a hoop upside down was important to avoid too much distortion (that will be a future project in itself, using distortion for effect) and frequent steam pressing on the wrong side was important also to pull out the inevitable buckling that does occur.  In her book Carol Shinn gives detailed instructions for colour blending – a terrific resource.

Friday, July 17, 2015

Machine Sketching

Early this year I started working on something I had not attempted for 50 years – figure sketching.  When I was at school, I was told I had no artistic ability, after drawing a circus scene complete with many people in it.  Since then I had no confidence in my drawing and only made stick people.  This year the group I belong to, Textilers, will be mounting our first exhibition.  The name and the aim is Breaking Boundaries – so I thought it was time to resurrect my figure sketching, and I then intended to stitch around the lines.  As usual I looked for and found an appropriate book on the subject, Stitch Draw by Rosie James.  I spent many hours in the next few months observing closely, trying and trying again, and drawing the people I saw in Rundle Mall in Adelaide, one of my regular haunts.  Sitting having a cappuccino means people don’t notice that you are sketching the people around you.  There were some fascinating groups of people at tables, walking around, shopping, using mobile phones and so on.  The fashions they wore interested me as much as the sketches I made, and interpreting them in machine stitch was the enjoyable end result.  I used various backgrounds, such as strips of dyed silk (seen here) using gold and rayon threads; also I used plain colour backgrounds with contrasting stitch colours.  Generally I liked to trace my original sketches onto white or coloured tissue paper and stitch through that, using a hoop upside down, with free motion straight stitch.  The paper could then be removed or left on in places for effect.  Fun!

Monday, May 13, 2013

Stitching on plastics

I've been experimenting with some old samples from last year.  These are plastics that I decided not to do anything further with.  I wanted something to stitch a double helix onto, as a sample for something else I'm working on, and pulled out a sheet of two colours of gift wrap cellophane, fused together with some clear plastic.  I didn't like working with fusing plastic, the fumes even with a respirator on myself are still in the air polluting it; but I kept the samples I made and the colours attracted me for this.  I used several different colour threads including metallics, to clearly define a double helix.  Not the centre part, just the outlines.
©Christine Linton

Some other machine leaves

Here are a few more of the close ups of the machine embroidered leaves.
printed organza leaves, double layers, free machining over beading wire to twist into shape ©Christine Linton

heavy machine embroidery on thick upholstery fabric, so it can be twisted into shape easily 
©Christine Linton


the back of the above leaf - in some ways even more interesting ©Christine Linton

Tuesday, May 7, 2013

Machine embroidery Leaves

I've had a request to see close-ups of my Leaves - so first the basket, which is how I originally displayed them.
©Christine Linton

Machine embroidered leaves

 Then some of the openwork Leaves.
©Christine Linton

Machine embroidered leaves

To make these, I zigzagged over copper wire for thick pieces, and over beading wire for thin lines.  Broke a few needles if I went too fast, or the wire bent back towards the needle - slow is best for this technique.  I used different colour threads for variety.

More next time.

Saturday, March 16, 2013

Ice Crystals as embroidery

One of the constants in my artwork is nature.  I love walking in nature, studying nature, and while birds are my favourite thing, sometimes I see a natural form that is so beautiful I want to interpret it in stitch.  This is what happened here.  While browsing Christi's blog Sweetpea Path, I found her beautiful photo of ice crystals (Ice Crystals photo, look at the blog and go down three photos) and she kindly gave me her permission to use it as the basis for some embroidery.  This is free-machine embroidery.  It is only a sample so I was experimenting and used three different metallic threads, working on some silk on to which I had transferred encaustic wax (always sounds so CAUSTIC but actually is a very gentle technique, just melting wax).  It has rippled because I didn't use a hoop but it actually gives it a more organic appearance.  Like ripples!
Embroidery by Christine Linton©Christine Linton from a photo by Christi, Sweetpea Path blog


Friday, March 1, 2013

Imagination

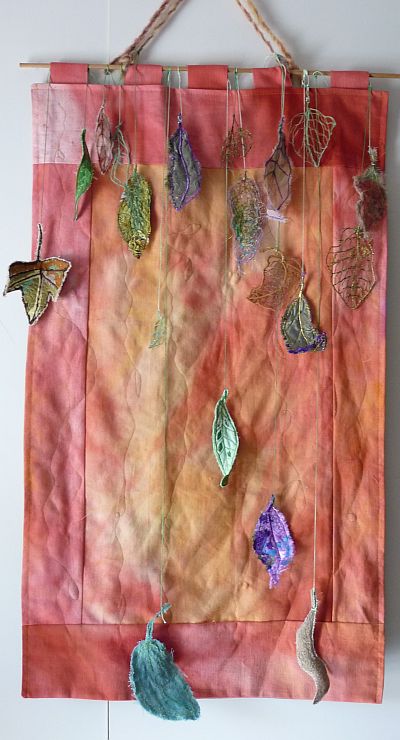
Where would we be without imagination?  It's where our art comes from.  I made some leaves using three techniques, free-machining over wire, over watersoluble fabric, and over sheer "bits", but my plan to put them in a basket meant they didn't show to their best advantage.  So I imagined a way to display them such that they could be turned around to see both sides but they could also all be seen at once.  I made a panel from my hand-dyed old sheeting, and strung the leaves from the dowel at the top.
Leaves Panel ©Christine Linton

Saturday, February 16, 2013

Embroidery - hand or machine?

I think the answer is both, because each has it's own beauty and use.  For instance, I bought a home-made cushion cover in a local charity shop purely because I think it is lovely; it is hand-embroidered with little shisha mirrors and satin stitch, back stitch, buttonhole stitch.   The dye from the thread had run when it was washed which I expect is why it was given away because it is so lovely, and the running dye adds to it's charm, making the person who washed it human (or the person who dyed the threads).
Then you've got machine embroidery like these leaves I made last year:
Machine lace leaves ©Christine Linton
I've always loved hand embroidery and I have found I love it even more now because I can use it as embellishment in new ways; I also learnt to control machcine embroidery much better.  Another textile artist with some very useful information on machine embroidery is Linda Matthews - see this link for using the decorative stitches on your sewing machine and how to get the best effects with them.

Monday, January 28, 2013

Embroidery and beading

Just thought I would post my New Years Eve machine embroidery.  It started off with hand embroidery for the city buildings at the bottom and for the first few fireworks, then I thought that it needed more life for such a sparkly type of evening, so I dropped a lot of metallic thread waste on the sky part and free-machined with clear thread.  Now the fireworks give the expression of excitement.  I used a piece of black satin given to me as a pillowcase, it was quite thick.  I mounted it on a piece of corrugated cardboard from a box, which is why it's not quite straight all round.  It has gift-wrapping ribbon hanging from it which I thought was an appropriate embellishment.
New Year's Eve embroidery ©Christine Linton
New Year's Eve embroidery, detail of the fireworks ©Christine Linton
Something I have tried to machine embroider but not yet succeeded to my own mind, is bird feathers - but I did bead one that I liked.
Beaded feather  ©Christine Linton
Cheryl Bridgart on the other hand has some stunning machine embroidered feathers in this image amongst a website full of stunning machine embroidery.  She inspires me to try again.

Saturday, December 18, 2010


This is my idea of New Years Eve - not that I normally go out and celebrate but I worked the skyscrapers at the bottom in running stitch, then machine-embroidered with gold metallic thread and other bright colours, randomly, showing my impression of fireworks.  Then I added some gift ribbon retrieved from various parcels, which I pinned into the top (I had used a piece of a box side for the mount).  The black satin is from a pillowcase given to me by my daughter.  She knows I'll take any sort of textile, I can always find a use for it.